Working on your well can feel like a big job, and getting the seals right is super important. If you don’t put them in correctly, you can end up with all sorts of problems down the road. This guide is all about avoiding those common slip-ups when you’re installing well seals. We’ll go through what to look out for and how to do it right, so your well stays in good shape.
Key Takeaways
- Know your seal parts before you start. Different seals have different bits that do different jobs.
- Make sure your work area is clean and you have all the right tools. Check the wellhead for any damage too.
- Putting the seal in the right spot and not forcing it too much is key. Gentle but firm is the way to go.
- Don’t use old or damaged seals. Make sure they’re facing the right way and give them a bit of lube if needed.
- After you’re done, double-check that everything looks good and keep an eye out for any leaks later on.
Understanding Well Seal Components
Alright, before we even think about slapping a new seal onto your wellhead, we gotta get familiar with what we’re actually working with. It’s not just one big rubber ring, you know? There are a few bits and pieces that all have their own job to do. Getting this part right means your seal will actually do its job, which is pretty important for keeping your water clean and your well running right.
Identifying Different Seal Types
So, not all well seals are created equal. You’ve got a few main kinds out there, and knowing which one you’ve got is step one. The most common ones you’ll run into are:
- O-rings: These are simple, circular rings, usually made of rubber or a similar flexible material. They work by being compressed into a groove, creating a tight barrier.
- Gaskets: These are often flat, but can be shaped, and they sit between two surfaces to prevent leaks. Think of them like a shim that also seals.
- Packings: These are a bit more complex, often made of multiple rings or braided material. They’re designed to seal around moving parts, like a pump shaft, but can also be used in static situations.
Recognizing Critical Seal Parts
Even within these types, there are specific parts that matter. For a basic O-ring, it’s pretty straightforward – the ring itself. But with more complex seals, you might see:
- The Sealing Element: This is the main part that actually stops the fluid or gas from getting through. It’s usually made of a flexible material.
- Backup Rings: Sometimes, especially under high pressure, a softer sealing element can get squeezed out. Backup rings, often made of harder plastic or metal, sit behind the main seal to stop this from happening.
- Metal Components: Some seals have metal parts that help with structural integrity, mounting, or even provide a harder sealing surface.
The Role of Each Component
Every single piece has a purpose. The sealing element is obvious – it’s the barrier. Backup rings are there to give the main seal support when things get tough, preventing it from deforming and failing under pressure. Metal parts might be there to help the seal fit snugly into its housing or to withstand the forces involved in the wellhead assembly.
It’s like a team. If one player isn’t doing their job, the whole operation can fall apart. You wouldn’t put a worn-out goalie in net, right? Same idea here. Each part needs to be in good shape and in the right place for the seal to work as intended.
So, next time you’re looking at a seal, take a moment. See what you’re dealing with. It’ll make the installation part way less confusing.
Preparing for Well Seal Installation
Alright, so you’re ready to get that well seal installed. Before you even think about putting it in, a little prep work goes a long way. Seriously, skipping this part is a surefire way to run into trouble later. It’s not rocket science, but it does require a bit of attention to detail.
Ensuring a Clean Installation Environment
First things first, you need a clean spot to work. Think about it: you’re trying to create a watertight seal. If you’ve got dirt, grit, or any other gunk hanging around the wellhead or on the seal itself, you’re basically inviting leaks from day one. So, take some time to clear away any debris. A clean rag and maybe a brush can do wonders here. A spotless area is your best friend for a good seal.
Gathering the Correct Tools and Materials
Don’t be that person who gets halfway through and realizes they’re missing something. Make a list and check it twice. You’ll likely need:
- The new well seal (obviously!)
- Appropriate tools for removing the old seal and installing the new one (wrenches, pliers, etc.)
- Lubricant – this is super important, we’ll get to that.
- Cleaning supplies (rags, brushes)
- Safety gear (gloves, eye protection)
Having everything within reach means you can focus on the job without interruptions.
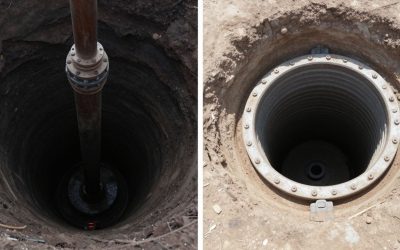
Inspecting the Wellhead for Damage
While you’re cleaning up, give the wellhead itself a good once-over. Look for any cracks, corrosion, or other damage. If the part where the seal sits is compromised, a new seal might not do much good. You might need to repair or replace parts of the wellhead before you can even think about installing the seal. It’s better to find these issues now than after you’ve already put in the new seal.
Sometimes, the smallest bit of damage can cause the biggest headaches down the line. A little bit of time spent checking things over now can save you a lot of hassle later. It’s all about preventing problems before they start.
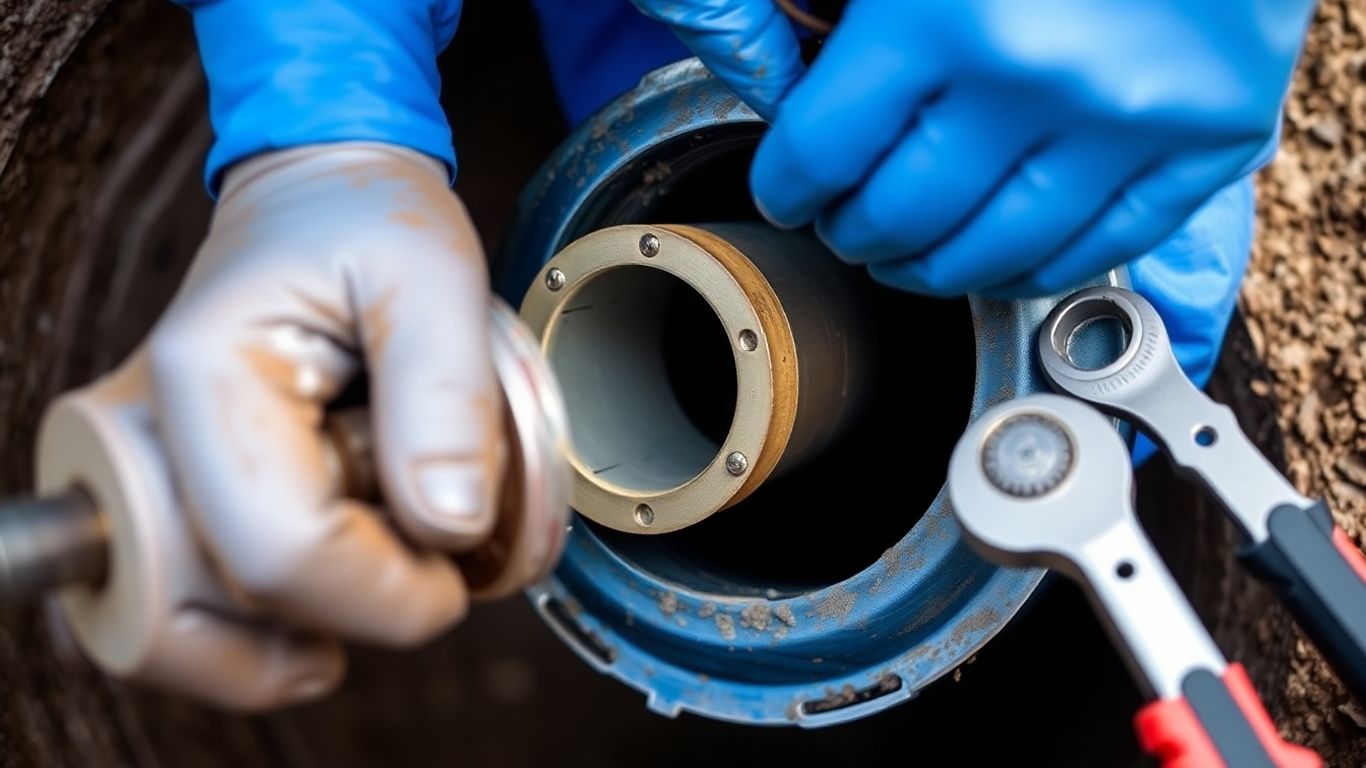
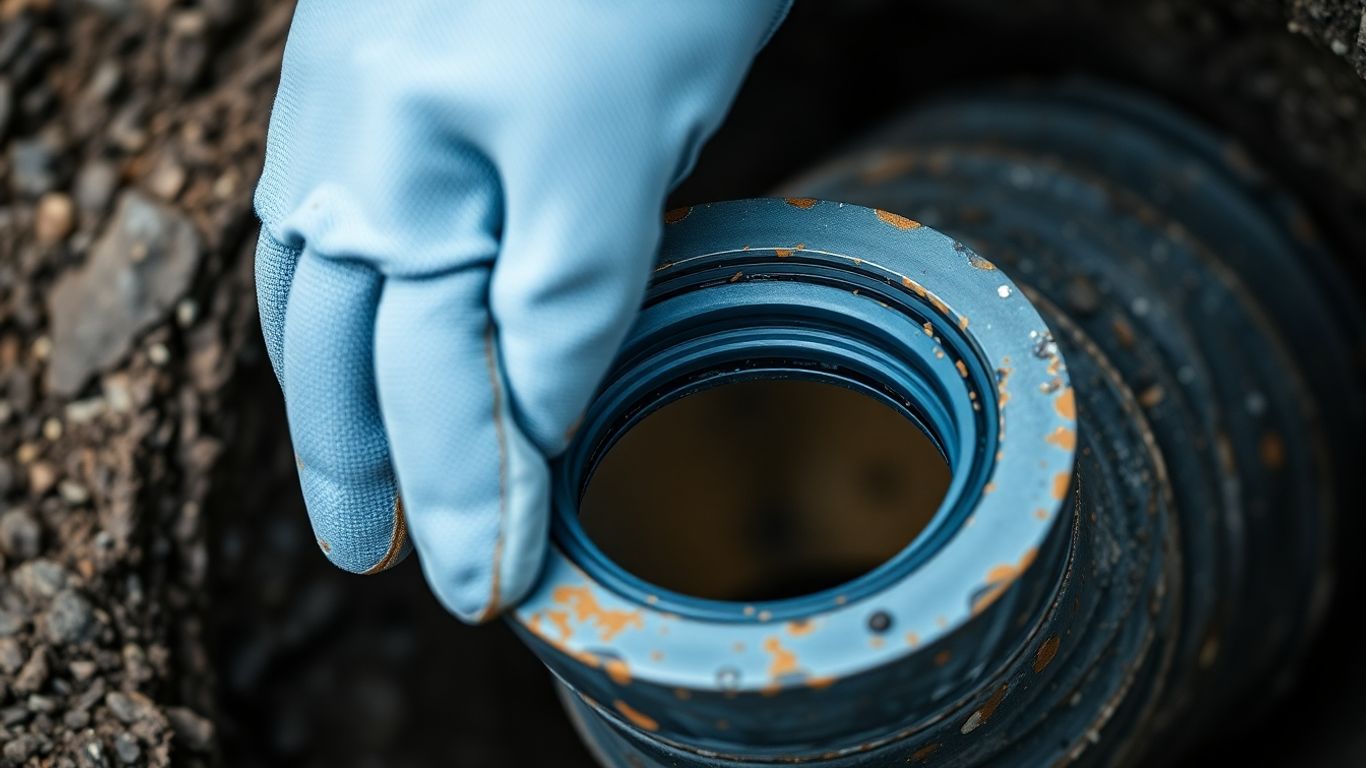
Proper Seal Placement Techniques
Alright, so you’ve got your new well seal ready to go. Now comes the part where you actually put it in place. This isn’t just about shoving it in there; there’s a right way and a wrong way, and getting it wrong can lead to all sorts of headaches down the line. Let’s break down how to get this done correctly.
Aligning the Seal Correctly
First things first, you need to make sure the seal is lined up properly. Think of it like putting a lid on a jar – it has to sit just right to seal. If you try to force it when it’s crooked, you’re just asking for trouble. You want the seal to sit flush against the wellhead surface. Look for any markings or guides on the seal itself or the wellhead that can help you get the orientation spot on. Getting the alignment right from the start saves a ton of hassle later.
Applying Appropriate Pressure
Once it’s lined up, you’ll need to apply some pressure to seat the seal. This isn’t a wrestling match, though. You want firm, even pressure. Too little, and it won’t seat properly, leaving gaps. Too much, and you risk damaging the seal or the wellhead. The goal is to compress the seal just enough so it makes good contact all the way around. Sometimes, a gentle tap with a rubber mallet can help, but always be careful not to hit too hard.
Avoiding Over-Tightening
This is a big one, and it’s easy to fall into this trap, especially if you’re worried about leaks. Over-tightening can actually do more harm than good. It can crush the seal material, making it less effective and shortening its lifespan. It can also warp or damage the wellhead itself, which is a much bigger problem to fix. You want it snug and secure, not cranked down with all your might. Think ‘firmly seated,’ not ‘permanently attached.’
It’s really about finding that sweet spot. You want enough compression to create a watertight barrier, but not so much that you deform the seal or stress the components. Patience and a gentle touch are your best friends here. If you’re unsure, it’s always better to err on the side of less pressure and then check your work.
Common Installation Errors to Sidestep
Alright, so you’ve got your new well seal, ready to go. It seems straightforward, right? Well, sometimes the simplest steps are where things go wrong. Making a mistake here can lead to leaks, contamination, or even damage to your wellhead. Let’s talk about what to watch out for.
Using Damaged or Worn Seals
This one’s a biggie. You might think, ‘It’s just a little nick,’ or ‘It still looks okay.’ But even minor damage can compromise the seal’s ability to do its job. A seal is designed to create a tight barrier, and any imperfection means that barrier isn’t as strong as it needs to be. Think of it like trying to patch a tire with a tiny hole – it might hold air for a bit, but it’s not a reliable fix.
- Always inspect your new seal before you even think about installing it. Look for:
- Cuts or nicks on the sealing surface.
- Cracks or signs of brittleness, especially if it’s been stored for a while.
- Deformation – is it perfectly round, or does it look squashed?
If you find anything, don’t use it. It’s not worth the risk. Grab a new one. It’s cheaper than dealing with a water contamination issue down the line.
Incorrect Seal Orientation
Seals are usually designed to fit one way. They have a specific profile that needs to mate correctly with the wellhead components. Putting it in backward or upside down means it won’t seat properly. This can lead to:
- Uneven pressure distribution.
- Gaps where water or contaminants can get in.
- The seal getting damaged during operation because it’s not supported correctly.
Sometimes, the orientation is obvious, but other times it’s subtle. Check any markings on the seal or consult the manufacturer’s instructions. If it doesn’t feel like it’s sliding into place easily, stop and double-check. Forcing it is a recipe for disaster.
Failing to Lubricate Properly
This is another common oversight. Many seals require a bit of lubrication to slide into place without tearing or binding. Without it, you risk:
- Scuffing or tearing the seal material as you push it into position.
- Creating uneven pressure points if the seal binds.
- Making installation much harder than it needs to be.
Use a lubricant that’s compatible with your seal material and the water it will be in contact with. Often, a bit of clean water or a specific rubber lubricant is recommended. Don’t just grab any old grease; some petroleum-based products can degrade rubber seals over time. A little bit of the right stuff goes a long way in making the installation smooth and protecting the seal.
The goal is a snug, leak-proof fit. Any shortcut taken during installation, whether it’s using a faulty part, putting it in the wrong way, or skipping a simple step like lubrication, can undo all your hard work and lead to bigger problems later on. Take your time and do it right the first time.
Post-Installation Checks and Maintenance
So, you’ve just finished putting in that new well seal. Great job! But don’t just walk away and forget about it. There are a couple of important steps to take right after installation, and then you’ll want to keep an eye on things over time. This isn’t a ‘set it and forget it’ kind of deal.
Verifying Seal Integrity
First things first, you need to make sure the seal is actually doing its job. A quick visual inspection can tell you a lot. Look for any obvious signs of a problem. Is the seal sitting flush? Are there any gaps or distortions? You want it to look like it’s a perfect fit, snug and secure.
Monitoring for Leaks
This is probably the most important part of the post-installation phase. You’re looking for any water or other fluids escaping around the seal. Even a small drip can turn into a bigger issue down the road. Keep an eye on the area for at least a few hours after installation, and then check it periodically.
- Check the ground around the wellhead for damp spots.
- Listen for any unusual sounds, like hissing.
- If you have monitoring equipment, check its readings.
Sometimes, a leak might not be immediately obvious. It could be a slow seep that only shows up under certain pressure conditions. Regular checks are key to catching these.
Establishing a Maintenance Schedule
Just like your car needs oil changes, your well seal needs a bit of attention now and then. Setting up a routine for checking the seal will help you catch problems early before they become expensive repairs. How often you need to check depends on a few things, like the type of seal, how old it is, and the conditions it’s operating under.
- Initial checks: Perform thorough checks immediately after installation and then again after 24 hours.
- Regular checks: Schedule monthly or quarterly inspections, depending on your system’s criticality.
- Annual review: Consider a more in-depth inspection once a year, possibly coinciding with other well maintenance activities.
Troubleshooting Seal Performance Issues
Even with the best intentions and careful installation, sometimes well seals just don’t perform as expected. Don’t panic if you run into trouble; most issues can be figured out with a bit of detective work. The key is to approach the problem systematically.
Diagnosing Premature Seal Failure
If your seal starts acting up sooner than it should, it’s usually a sign something went wrong during installation or that the operating conditions are tougher than anticipated. Here are a few common culprits:
- Improper Installation: This is a big one. Think about whether the seal was seated correctly, if it was the right type for the job, or if it got damaged during fitting. Even a tiny nick can lead to early failure.
- Environmental Stress: Is the seal exposed to extreme temperatures, harsh chemicals, or excessive vibration? These factors can wear down a seal much faster than normal.
- Material Defects: While less common, sometimes a seal might have a manufacturing flaw. If you suspect this, it’s worth noting the brand and batch number.
Sometimes, what looks like seal failure is actually a symptom of another problem in the wellhead system. It’s always a good idea to check the surrounding components before pointing the finger solely at the seal.
Addressing Persistent Leaks
Leaks are the most obvious sign that your seal isn’t doing its job. If you’ve checked the obvious and the leak continues, consider these points:
- Seal Material Compatibility: Did you use a seal material that can handle the fluids or gases it’s in contact with? Some materials degrade quickly when exposed to certain substances.
- Surface Finish: The surface the seal presses against needs to be smooth. Roughness can create tiny channels for leaks to form.
- Pressure Fluctuations: If the pressure in the wellhead is constantly changing, it can stress the seal and eventually cause it to fail or leak.
When to Seek Professional Assistance
There comes a point where DIY troubleshooting just isn’t cutting it. If you’ve gone through the steps and are still scratching your head, or if the problem seems complex, it’s time to call in the pros. They have specialized tools and a depth of experience that can quickly pinpoint issues you might miss. Don’t hesitate to reach out if:
- You’re dealing with a high-pressure or hazardous environment.
- The problem involves specialized equipment you’re not familiar with.
- You’ve tried multiple solutions without success.
- Safety is a concern, and you’re not confident in your ability to fix it.
Wrapping It Up
So, we’ve gone over a few common slip-ups people make when putting in well seals. It’s not the most exciting job, I know, but getting it right saves a lot of headaches down the road. Think about it – a bad seal can mean water problems, or worse, damage to your whole well system. Taking your time, double-checking your steps, and using the right parts really makes a difference. If you’re not sure about something, it’s always better to ask for help or look up a good guide. A little effort now can prevent big, costly fixes later on. Good luck with your project!
Frequently Asked Questions
What exactly is a well seal, and why is it so important?
Think of a well seal as a rubber gasket or a special plug that keeps your well’s opening shut tight. It’s super important because it stops dirt, bugs, and yucky stuff from getting into your clean water supply. It’s like a protective shield for your drinking water!
Can I just use any old rubber ring I find lying around as a well seal?
Nope, definitely not! Well seals are made from special materials that can handle being underground and near water for a long time. Using the wrong kind could mean it breaks down quickly, letting in unwanted things and making your water unsafe. Always use the seal made specifically for your well.
What’s the biggest mistake people make when putting in a new well seal?
One of the most common slip-ups is not putting the seal in the right way. It has to fit perfectly, like a puzzle piece. If it’s crooked or upside down, it won’t seal properly, and you might end up with leaks or contamination. Also, some folks try to force it too hard, which can damage the seal or the wellhead itself.
How do I know if my well seal is installed correctly after I’m done?
After you’ve put the new seal in, give it a good look. Make sure it’s sitting flat and snug all the way around. You can also gently try to wiggle the cap or cover it’s sealing. If it feels solid and doesn’t move, that’s a good sign. The best check is to keep an eye out for any water or dirt around the seal in the days that follow.
Do I need to put anything on the seal before I install it?
Yes, often you do! A little bit of special lubricant, usually recommended by the seal manufacturer, can help the seal slide into place smoothly without tearing or getting damaged. It also helps create a better, tighter seal. Just don’t use just any grease; make sure it’s the right kind for well seals.
How often should I check my well seal to make sure it’s still working well?
It’s a good idea to give your well seal a look at least once a year, maybe when you’re doing other yard work. Also, check it if you notice any strange smells or tastes in your water, or if there’s been a lot of heavy rain or flooding. Regular checks can catch problems early before they become big issues.