Storms can really mess with your private well. Heavy rain and flooding can push all sorts of junk into your water supply, and you might not even know it until it’s too late. This article talks about how to keep your well safe, especially with all the crazy weather we’ve been having lately. We’ll cover how storms affect wells, how to seal them up tight, and what to do if you think your water’s gone bad. Thinking about Well Seals and Climate Resilience Keeping Wells Safe from Storms is super important for anyone with a well.
Key Takeaways
- Storm runoff can carry pollutants and debris into your well, making the water unsafe.
- Flooding around your wellhead increases the risk of contaminants getting into your drinking water.
- Soil erosion caused by storms can lead to debris and unwanted substances entering private wells.
- Regular well water testing is vital to catch contamination and prevent potential health issues.
- Maintaining a secure and well-sealed well is crucial, especially during storm season, to protect your water supply.
Understanding Well Vulnerabilities During Storms
When the skies open up and storms roll in, especially the ones that bring serious rain and flooding, our private wells can end up in a pretty tricky spot. All that extra water has to go somewhere, right? And unfortunately, it can pick up a whole lot of unwanted passengers along the way. This isn’t just about a bit of mud or leaves; surface runoff can carry all sorts of things we really don’t want in our drinking water – think pesticides from fields, oil drips from driveways, or even waste from animals. When this contaminated water starts soaking into the ground, it can make its way down to the aquifer that feeds your well.
How Storms Impact Private Wells
Heavy rainfall is usually the main troublemaker. It can just overwhelm the ground’s natural ability to filter things out, pushing contaminants deeper and closer to your water source. Flooding is another big concern. If floodwaters get high enough to cover your wellhead, there’s a real chance that surface water, along with whatever’s floating in it, can get directly into your well system. Even strong winds can cause issues by loosening the soil around the well casing, creating little pathways for contaminants to sneak in. It’s like the storm is actively looking for a way in.
Recognizing Changes in Water Quality After Storms
Sometimes, you might notice your water looks different after a storm. Maybe it’s a bit cloudy, has a funny smell, or even tastes off – perhaps a bit metallic or earthy. These are usually pretty good signs that something isn’t quite right. But here’s the tricky part: a lot of harmful contaminants don’t change the way your water looks, smells, or tastes at all. You could be drinking unsafe water without even realizing it.
Relying only on what you see, smell, or taste to figure out if your water is safe after a storm is a risky game. Many dangerous contaminants are invisible. The only sure way to know if your water is safe is to get it tested.
The Role of Land Use in Well Contamination
What’s happening on the land around your well plays a big part in how vulnerable it is. If you live near farms, there’s a higher chance of pesticides or fertilizers washing into the groundwater. Areas with lots of pavement can create more runoff, carrying oil and other chemicals. Even just having a poorly maintained septic system nearby can be a source of contamination. Basically, anything on the surface that can be washed away by rain or floodwaters has the potential to end up in your well if it’s not properly protected. It’s a good idea to take a look at what’s happening on your property and any nearby properties that might affect your well’s water source.
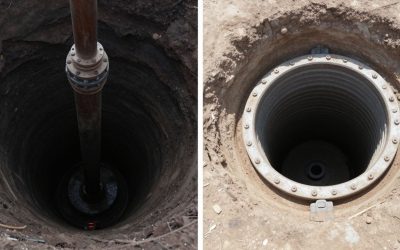
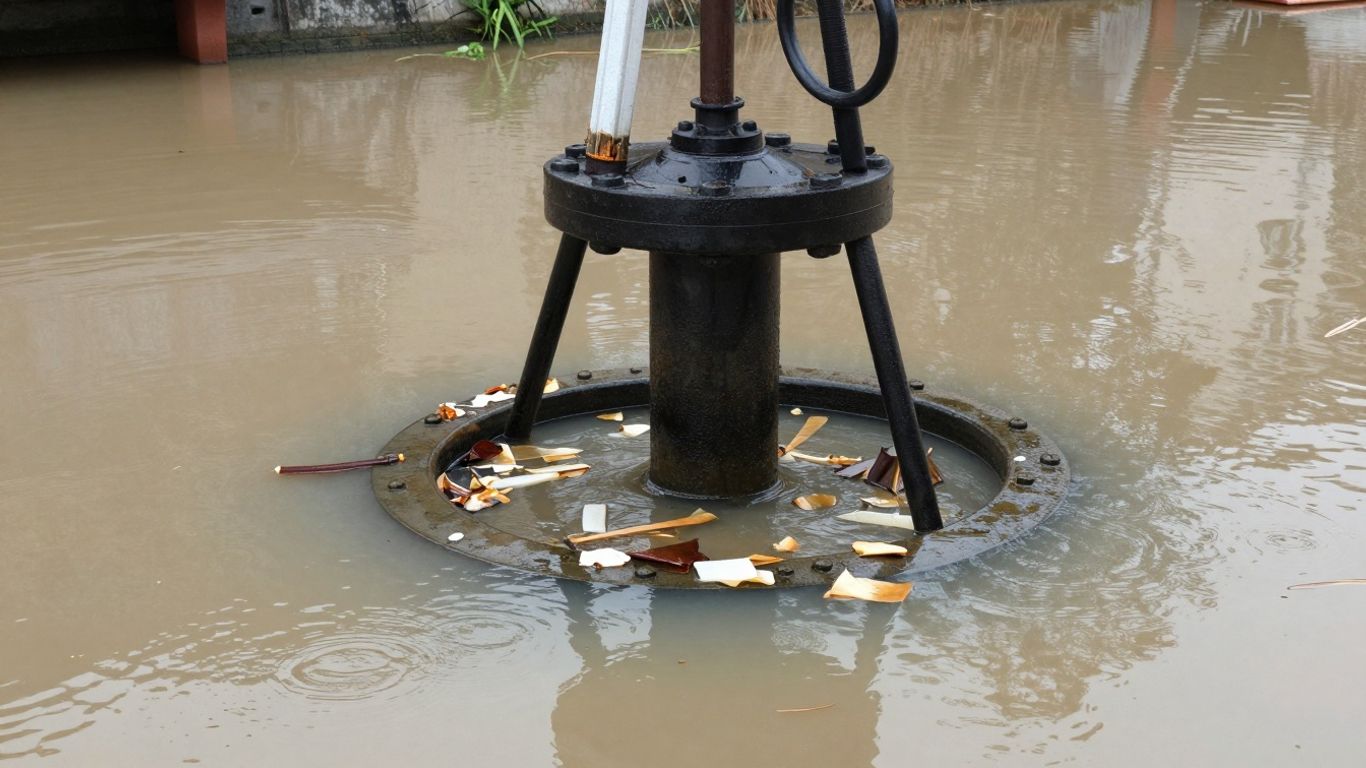
Fortifying Wellheads Against Floodwaters
When storms hit, especially those that bring a lot of rain and the possibility of flooding, your wellhead becomes a really vulnerable spot. Think of it as the main door to your water supply. If that door isn’t sealed up tight, all sorts of unwanted stuff can get in. We’re talking about surface water carrying bacteria, chemicals from runoff, and even just plain old dirt and debris. It’s not a good situation, and it can quickly turn your safe drinking water into something that’s not safe at all.
Sealing Cracks and Worn Seals
This is where the real work starts. You absolutely need to make sure every little opening is shut down. Over time, the seals around your well casing can get dry, crack, or just wear thin. The same goes for the well cap itself. These aren’t just minor cosmetic issues; they’re direct pathways for trouble to get into your water.
- Inspect Regularly: Get down there and look closely. Are there any visible cracks in the concrete apron around the well? Does the seal around the casing look brittle or torn? Is the well cap fitting snugly, or does it feel loose?
- Repair Promptly: Small cracks can be sealed with appropriate hydraulic cement or specialized sealants. If a seal is worn out, it needs to be replaced. Don’t just slap some tape on it; use materials designed for well protection.
- Check the Casing: Make sure the well casing itself isn’t damaged. A bent or cracked casing is a much bigger problem and might need professional attention.
The main goal here is to create a solid barrier between what’s happening on the surface and your groundwater.
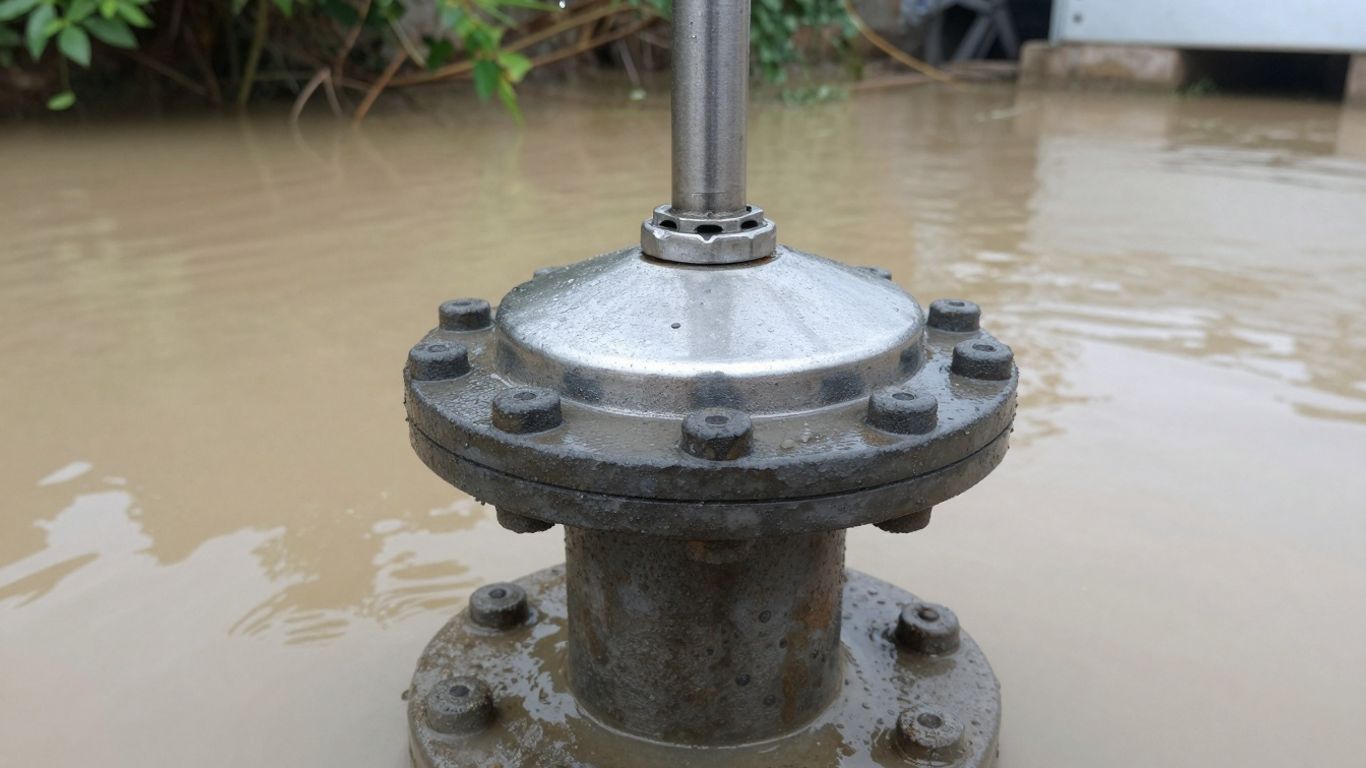
Installing Flood-Proof Well Caps
Beyond just sealing up any cracks, you need the right kind of cap. Standard caps might keep out bugs, but they often aren’t built to handle serious flood conditions. A flood-proof cap is designed to create a much more secure seal, often with features that stop water from seeping in even if it gets submerged.
- Look for Vents: Even a flood-proof cap needs a screened vent to let air pressure change. The important thing is that the vent is designed to keep water out.
- Secure Fastening: The cap needs to be attached firmly to the well casing. Some flood-proof caps use locking mechanisms or special clamps to make sure they don’t get knocked off by rising water.
- Material Matters: Choose caps made from tough, non-corrosive materials that can handle bad weather and being exposed for a long time.
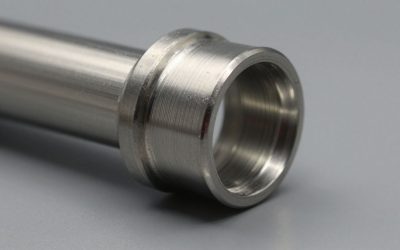
Material Matters for Well Caps
When you’re picking out a new well cap, especially one meant to be flood-proof, the material it’s made from is a big deal. You want something that’s going to last and really do its job. Cheaper materials might seem okay at first, but they can break down quickly when exposed to the elements, especially water and UV rays from the sun. Stainless steel and heavy-duty plastics are usually good choices because they resist rust and corrosion. Make sure whatever you choose is rated for outdoor use and can withstand temperature changes without becoming brittle.
A well-sealed and properly capped wellhead is your first line of defense against surface contaminants entering your water supply during heavy rains or flooding events. Don’t underestimate the importance of these seemingly small details.
Implementing Effective Drainage Systems
Even with a perfectly sealed wellhead, if you have water pooling right around it, you’re asking for trouble. Water needs somewhere to go, and that place shouldn’t be your well. Think about it: heavy, fast rain can overwhelm your well system quickly, especially if the ground around it isn’t stable. This can push all sorts of unwanted stuff, from dirt and leaves to chemicals from nearby yards or farms, right into your water supply. Proper drainage is your first line of defense against surface water contamination.
Re-grading the Ground Around the Well
The ground around your well should slope away from it. This is basic landscaping, but it’s super important for well protection. You want to create a natural channel for water to flow away from the well casing, not pool around it. If you notice water collecting near the well after a rain, it’s a clear sign that the grading needs some attention.
- Check the slope: Ensure a consistent downward slope for at least 10 feet around the wellhead.
- Fill low spots: Add soil to any depressions where water might gather.
- Avoid direct flow: Make sure the graded area doesn’t direct water towards your house foundation or septic system.
Erosion Control Measures for Well Sites
Beyond just grading, you might need more robust measures to keep soil from washing towards your well, especially if your property is sloped or prone to heavy runoff. Erosion can undermine the ground around your well casing, creating pathways for contaminants.
Keeping the area around your well stable and free of standing water is key. It’s not just about aesthetics; it’s about protecting the quality of your drinking water from whatever the surface might carry.
- Install Swales: These are shallow ditches, often vegetated, designed to intercept and redirect surface water flow. They can be a very effective way to channel water away from the well area.
- Use French Drains: For more persistent water issues, a French drain (a trench filled with gravel and a perforated pipe) can collect groundwater and surface water and carry it to a safe discharge point away from the well.
- Plant Ground Cover: Establishing hardy, deep-rooted plants around the well site can help stabilize the soil and reduce erosion. Just be mindful not to plant anything too close that could interfere with well maintenance or access.
Protecting Your Well from Future Damage
After a flood, or even just after a really big storm, you might be thinking about how to make sure your well is safer next time. It’s smart to look at ways to prevent damage before it happens. This isn’t just about fixing things after the fact; it’s about making your well more resilient.
Elevating Well Casings Above Flood Levels
One of the most direct ways to keep floodwaters from getting into your well is to make sure the top part, the casing, sticks up high enough. If your well casing is too low, it’s an easy target for rising water. Extending the casing above the highest flood level you’ve experienced or expect is a solid plan. This means the actual opening of your well stays well above the water line, even during a serious inundation. It’s a bit of construction work, sure, but it’s a really effective way to stop surface water from getting a direct route into your water supply.
Considering New Well Locations
Sometimes, the best defense is a good offense, and that might mean rethinking where your well is. If your property is in a low-lying area that floods regularly, or if you’ve had repeated issues, it might be time to think about drilling a new well. Finding a spot that’s naturally higher ground and less prone to seasonal flooding can save you a lot of headaches down the road. It’s a bigger project, obviously, but for areas with persistent flood problems, it’s a long-term solution that offers much better protection.
Securing Well Caps and Covers
Don’t underestimate the importance of a good well cap. This is the lid on your well, and it needs to be secure and watertight. Over time, caps can become loose, crack, or get damaged. A damaged or loose cap is like leaving the door wide open for contaminants. This includes everything from insects and small animals to dirt, debris, and contaminated surface water. Make sure your cap is made of durable material, fits snugly, and has a good seal. Regular checks are key here; you want to catch any wear and tear before it becomes a problem. A properly sealed cap is your first line of defense against many common contaminants.
Assessing and Restoring a Flooded Well
So, your well took a hit from that flood? Don’t panic, but do take it seriously. Water getting into your well during a flood isn’t just a little inconvenience; it’s a potential health hazard. Floodwaters can carry all sorts of nasty stuff – bacteria, chemicals, sediment, you name it. The most important thing is to not use the water until you’re sure it’s safe.
Initial Well Inspection After Flooding
First things first, you need to check out your well. Look for any obvious signs that floodwater made its way in. Did the water level rise significantly? Is there mud or debris around the well casing? Check if the ground around the well looks like it eroded, which could create a path for contaminants. Also, take a good look at the well casing itself – any cracks or bends? And don’t forget the well cap; make sure it’s still sealed tight. If you see any electrical wires or components that were submerged, stay clear and call a professional. It’s really about spotting any damage or entry points.
Cleaning and Pumping Floodwater
If you suspect your well was flooded, don’t turn on the pump just yet. You need to get the gunk out first. You might need to remove the pump to get better access to clean out any mud, silt, or other junk that settled in. After the initial cleaning, it’s time to pump the well. The goal here is to get the water running clear. You’ll want to use a hose to direct this water away from your house, not into your septic system. How long this takes really depends on your well – could be a quick job, or it might take a while.
Disinfecting Your Water Well
Even after you’ve pumped the water until it looks clear, you absolutely must disinfect your well before you even think about drinking it, cooking with it, or bathing in it. Floodwater can introduce bacteria and other microorganisms that aren’t visible. There are a few ways to disinfect, often involving adding a specific amount of chlorine bleach.
It’s critical to follow proper disinfection procedures. Using too little won’t kill everything, and using too much can create other issues. Always err on the side of caution and consult with a professional if you’re unsure.
After disinfection, you’ll typically need to flush the system again and then wait a bit before testing the water. Testing is the only way to know for sure if the water is safe to drink again. If you have any doubts, or if the water still looks, smells, or tastes off, get professional help.
Regional Weather Patterns and Well Protection
Different parts of the country deal with different kinds of weather, and that really matters when it comes to keeping your well water clean. What works to protect a well in Florida might not be the best approach for someone in Montana, for example. It’s all about knowing what’s likely to happen in your neck of the woods.
Coastal Storm Impacts on Wells
If you live near the coast, you’re probably familiar with hurricanes and tropical storms. These can bring a double whammy: tons of rain that can flood everything, and storm surges that push saltwater inland. Saltwater intrusion is a big worry for coastal wells, as it can make your fresh water undrinkable and damage your plumbing. When these storms hit, the main things to focus on are making sure your wellhead is sealed up tight and having a backup plan for when the power goes out, because your pump won’t run without electricity.
Inland Flood Risks and Well Security
Moving away from the coast, places in the Midwest or other inland areas might face different threats. Think heavy thunderstorms that cause flash floods, or even tornadoes that can kick up a lot of debris and cause soil erosion. When the ground gets saturated or washed away, it can create easy paths for contaminants to get into your well casing. So, for these areas, making sure the ground around your well slopes away from it and that your well casing is strong and sealed is super important. It’s about preventing that surface water from getting a direct route to your water source.
Adapting Protection Strategies to Local Climate
So, how do you actually get ready? It really comes down to your specific location and the weather you usually get.
- Hurricane Zones: Focus on flood-proofing your wellhead, securing it against high winds, and having a generator or other backup power for your pump.
- Flash Flood Areas: Prioritize good drainage around the well. Check for and seal any cracks in the casing. Make sure the well cap is secure and watertight.
- Drought-Prone Regions: While flooding might seem less likely, intense rain events can still happen. Ensure your well is properly sealed to prevent contamination during these rare but potentially damaging downpours.
- Areas with Heavy Snowfall: Consider how snowmelt in the spring might cause runoff and saturation around your well. Ensure drainage is clear before the thaw.
Understanding the typical weather patterns in your region isn’t just about knowing when to put up shutters. It’s about taking targeted steps to safeguard your private water supply. A one-size-fits-all approach just won’t cut it when it comes to well protection.
Wrapping Up: Keeping Your Water Safe
So, we’ve talked a lot about how storms can really mess with your well water. It’s clear that keeping those seals tight and the wellhead protected is super important, especially when the weather gets rough. Think of it like putting a good lock on your door before a storm hits – you’re just trying to keep the bad stuff out. Regular checks and making sure water drains away from your well are simple things that make a big difference. And remember, even if you do everything right, testing your water after a flood is the only way to be absolutely sure it’s safe to drink. It’s all about being prepared and taking care of your water source, so you and your family stay healthy.
Frequently Asked Questions
How can storms make my well water unsafe?
When storms bring heavy rain and flooding, they can wash all sorts of unwanted things into your well. This includes dirt, chemicals from farms or roads, and even animal waste. If your well isn’t sealed up tight, this contaminated water can easily mix with your drinking water, making it unsafe to use.
What signs might show my well water is bad after a storm?
Sometimes, you might notice your water looks cloudy, smells funny, or tastes weird after a storm. However, many dangerous contaminants don’t change the water’s appearance, smell, or taste at all. So, it’s important not to rely only on your senses to know if your water is safe.
What’s the most important thing to do after my well has been flooded?
After your well has been flooded, the most crucial step is to get your water tested. Even if you clean and disinfect it, testing is the only way to be sure that all the harmful stuff is gone and your water is safe to drink again. Don’t skip this step!
How can I stop water from getting into my well during a flood?
You can help keep floodwaters out by making sure the seal around your well pipe is tight and that the well cap is secure and waterproof. Also, making sure the ground slopes away from your well helps direct surface water away, preventing it from pooling around the wellhead.
What if my well is in an area that floods often?
If your area floods frequently, you might need to make bigger changes. This could include raising the well casing so it’s higher than floodwaters, improving drainage around the well, or even considering drilling a new well in a location that’s less likely to flood.
What is a ‘flood-proof’ well cap?
A flood-proof well cap is designed to create a much stronger seal than a regular cap. It’s built to keep water from seeping in, even if the water level rises around it. These caps often have special features to ensure they stay tightly closed and don’t get washed away by floodwaters.